.

.

Well Done, You Will Be Missed. Queen Elizabeth Has Died on This Day.

Ten years ago on the occassion of her Diamond Jubilee, I posted this collage image of Queen Elizabeth sharing her love of dogs, in particular, corgis.  

Today, after a 70 year reign, the beloved Queen died.  She will be sorely missed by her family and friends.   I imagine the British public and people around the world have their own special memories of her.  

As people gathered outside Buckingham Palace today, a double rainbow appeared over Windsor Castle and the palace.  Seems like a lovely and hopeful sign for this moment in history.

Hoping all your rainbows in the sky are good signs for you.


This Is a Cleat Towel Treat, Easy Towel Holder and Inexpensive, Too!

 Are you familiar with cleats?  I've seen them, but didn't know their name until I started looking for them online.  

If you sail, you may have seen these simple looking items holding ropes.  They look a bit like skateboards or skiis with a stand.


https://newendstudio.blogspot.com

This is the simple design I made to make towel holders.  

Here is what you need to buy to make this version or a similar style to suit your style:

  •   Cleats  They come with the mounting screws. 
I bought mine from Walmart.  They are rubberized. I liked the rubber/plastic version instead of the metal versions which need serious scrubbing to remove the protective oils they are shipped and sold with to the stores.  The oil has a strong odor, too, which is a particular turn off for me.  Also, I thought the rubber type would hold up better (not rust).

  • Photo frames.  Mine were from Dollar Tree.  I removed the glass and saved that for another use.  These frames are 5x7.
  • Placemats.  I found these at Walmart to match the silver/chrome finish of the frames and the bathroom fixtures.  As a bonus surprise, the placemats are that pretty opalescent  finish (like a mermaid's tail.)
  • Power or Hand Tools to attach the frames to the wall.  
  • Ruler or Tape Measure.  Pen or Pencil.  Craft Knife or Sharp Razor Type Knife.

How I made the towel holders:


  • Remove  the cardboard backing  and the "mat" from the frames. 
  • Safely remove the glass from the frames and set aside. Use the glass in a different project.

  •  Place the cardboard backing over the placemat and cut to fit the frame.
  • Put the cardboard over the placemat and make "starter holes" through both for the mounting screws to drill through into the wall. It's probably easier to make the holes with a manual tool such as an awl or knife.
  • Make sure you place the cleats in the direction you want to hang your towel- vertically or horizontally.  Also, center the cleat on the frame if that is the look you want to see.
  • Reassemble the parts:  Mat, Placemat, Cardboard Backing into the frame. 
  • Mark on the wall where you want to hang your Towel Holder. 
  • Drill carefully and that's it.  


After using these towel holders with the original paper mat (as in the photo) for a few years, I am surprised that the water has not damaged the paper mat as that it can be noticed.   

For a change, I have added a new edging "mat" which is a woodgrain look fabric placemat, a bit more protective than the paper mat.  Also, the new placemat looks better with the vanity and contrasts nicely with the opalescent placemat.

Thanks for reading.


So Easy Just Get Weaving Your Own Table Cover

With so much "decluttering" happening these tables have served their purpose well.  With time on my hands, I decided to ditch tablecloths and make something new. 


https://newendstudio.blogspot.com

Originally, the idea was to make this into a wall clock.  But, with some vinyl unused in a box, I thought I would see if I could weave a covering, and so that's what I did.

It's easy.  Gather a marker, ruler or tape measure, scissors or rotary cutter (and something to protect the cutting surface ie countertop) heavy duty stapler, masking tape, and clear off an area to work on.

https://newendstudio.blogspot.com
Measure the length needed for each strip giving yourself extra length for stapling the strip to the underside of the table.   If you are covering a round table, square table, rectangular table, etc.  the length of the strips will vary according to which design shape you are covering.

My strips were 3/4 inch wide.  Calculate how many strips you need for the weave by deciding which color(s) you will be weaving in the under - over pattern.   How many long, how many wide?

https://newendstudio.blogspot.com

I placed my strips on the countertop and taped at one end.   If your strips have a good side, be sure and place the good side facing away from you. 

Weaving the pieces together on a flat surface, then placing the tabletop on the woven strips gave me more control over the tightness of the weave and less chance of the pattern coming apart. It seemed logical at the time!
 

https://newendstudio.blogspot.com

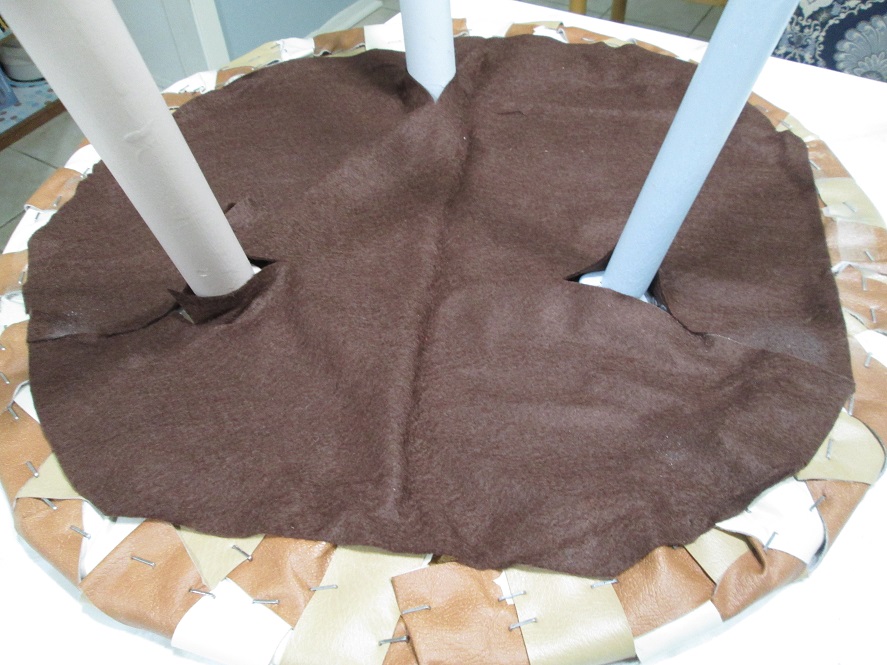
Once the strips are all woven, I put the tabletop on them, carefully lifted the tape from one end and started stapling the strips to the table.  I pulled each strip tightly, but gently so there are no gaps or spaces.  

By this step, you are almost finished, so go slowly.  You can check the strips  for being inline and wrinkle free as you staple.  If the strips are too long once you staple, just scissor off the extra.

I did glue some felt to theottom of the tabletop to hide the staples, but it's not really necessary. 


I made these coverings and used the tables for some time and next I think I will make these over into wall clocks.   I've got plenty of paint to declutter on these, just have to decide which to start with.  

Thanks for reading.  

Free Printables for Valentine Fun


Happy Valentine's Day, here are some sweets to tide you over until the 14th or the weekend after.


I made these Free Printables for you.

These new printables are letter sized sheets of One Inch Circles of acronyms plus Valentine sayings and images. Two different printables for the same holiday.


Some ideas for using these tags*

Stick on the bottom of foiled kisses
On the top of wrapped candies
Threaded on a party straw
Message on a frosted cake
Wrap a present
Cut into strips and encircle a beverage
Tuck into a Lunch bag
In an Art Project
As Confetti
As little happy reminders to yourself on a mirror

*For Personal Use


Free printable
Valentine Sayings and Acronyms on white background.

Click the link to open the file for a full page printing sized image.


Free printable
Valentine Sayings and Symbols on black background.

Click the link to open the file for a full page printing sized image.


If you make something, please leave a comment with a link, I'd love to see it.

Happy St. Valentine Day ...


This blog post was first published February 2016.

DIY Egg Cozies, Easy Egg Casserole, and Happy Easter Greetings

Happy Easter!


I like easy recipes, and this one is for fresh eggs as opposed to the hard boiled ones from Easter.  The weather here is very changeable, so one day it's 43F and the next it's 72F.  Which makes me want to use the oven on the cooler days.  Here is the recipe for the egg casserole.


If you have a couple of minutes to spare, you can make these egg cozies with fabric scraps, ribbons, or what you have handy.  Here is the post where they first appeared on the blog.


I hope you all have a very Happy Easter.
Gloria